How to Use a Shoulder Joint Injection Model for Training
A shoulder joint injection model is a very practical piece of equipment designed to teach inexperienced students a very practical core skill. Success with a needle—for the purpose of aspiration or joint injection—depends on confidence, familiarity, and experience.
An anatomical drawing can display the complex network of tough skin, dense muscle, and overlapping bone that must be navigated to deliver an effective dose or release. What it can’t simulate is the physical pressure or steady accuracy needed for successful execution—or the consequences of poor accuracy.
A working shoulder joint injection model made from realistic materials, on the other hand, can give a trainee a real-life experience without placing any real patients in harm’s way.
A Realistic Model with Battery Included
The subject of this how-to guide is the Shoulder Injection Trainer developed by Sawbones. The model was designed to teach, or demonstrate, needle placement for aspiration and joint injection around the shoulder.
It has a few essential features that make it a worthwhile study for novice medical professionals:
Haptic feedback |
Among the most notable features is the inclusion of haptic feedback. This system of communication through touch gives students an instant, audible response to their efforts. Simply put, the needle will trigger an audio output when it encounters a specified part of the model. This can be used as positive reinforcement signaling a successful injection, or as a deterrent signaling unwanted contact. |
Lifelike anatomy |
The model contains skin and bone simulations made from advanced composite materials that mimic real-life performance. It also has authentic, interactive recreations of:
Additional conductive structures can be added on request, increasing the shelf life and functionality of the model. |
Palpation |
This model is also realistic enough to allow effective training in palpation methods around the major landmarks of the shoulder and upper torso. Students can employ a literal hands-on approach and learn how to manually gauge the size, structure, texture, and sensitivity of an organ during diagnosis. |
Multipurpose training |
As is common among the current generation of medical training models, the shoulder joint injection model can be used to perform a range of different functions depending on the instructor’s goals. The general techniques are aspiration or joint injection, but students can be asked to target different areas or follow differing best practice procedures. |
All this complexity and potential is delivered through an intuitive design that effectively replicates real-life presentations within an abstract and easy-to-access partial anatomy.
Using the model takes only a few basic steps, and the batteries are included.
Using a Shoulder Joint Injection Model
Effectively using an injection model means mastering just a few basic steps.
1. Get things set up correctly
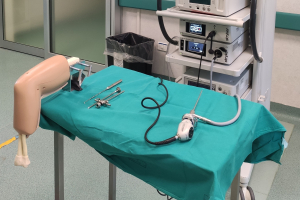
The model ships with only a few distinct parts and is easy to assemble. There’s the soft tissue injection shoulder, an audio/haptic feedback box with leads, the needle assembly, and the all-important dry erase marker. Once the connection between model, needle, and feedback box is established, the unit is ready for use. Everything is replaceable, including the shoulder skin sleeve, and the only real maintenance concern is remembering not to remove the plunger for needle from the syringe, or to introduce any fluids to the assembly.
2. Select your procedure
Instructors can determine an appropriate application of the aspiration or joint injection functions of the model. As Sawbones engineers are capable of producing custom models and solutions, medical instructors are able to work in partnership collaboration to produce teaching resources that better suit their course design. Such collaborations have already produced a range of joint injection models, including specializations for the elbow, wrist, trunk, hip, and knee.
3. Find the right spot for injection
Students can use the shoulder joint injection model to target any of the anatomical features outlined above, or a range of alternative injection points can be added upon request.
The realism of the model ensures students must choose injection points that represent best practice in clinical settings. The authenticity is designed to develop muscle memory and build confidence through repetition.
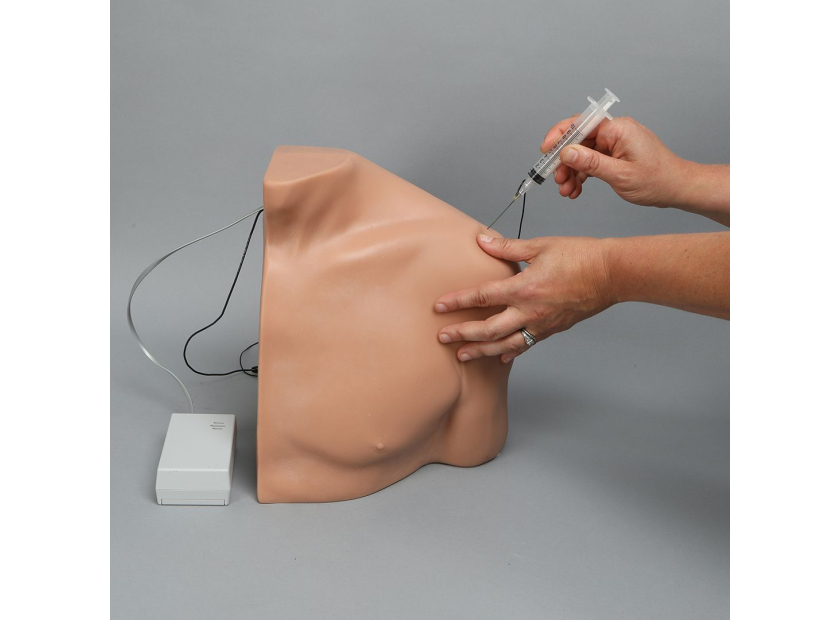
4. Make your injection
After using the marker to identify targets, students can begin the process of learning how to administer an injection. The realistic nature of the model materials replicates the feel, resistance, and performance of the human body. Once the tip of the needle has contacted the correct area, the haptic feedback unit will emit an audible tone.
This audio interaction marks out the shoulder joint injection model from static iterations that require the strict attention of a supervisor in order to provide comment on the procedure’s success. With haptic feedback, results are swift and deliberate.
5. Assess and repeat
A final prime feature of engineered medical training equipment is the ability to safely reuse the model. Robust construction ensures it can be used across cohorts, and the replaceable, adaptable design means the resources can evolve with student skill development.
Most importantly, the reusable nature of the design allows students to assess their efforts and repeat actions until they have developed expertise and confidence.
The simplicity of the injection training procedure reflects the potential for large-scale use across an institutional setting, and the developing independence of novice students. The model’s authenticity and innovative use of haptic feedback ensure it can develop core skills that can be successfully transferred to a clinical setting.
Create Your Own Interactive Medical Training Tools
The Sawbones shoulder joint injection model was developed for the express purpose of instruction and demonstration. Through partnership with leading educators across every major medical field, other models can be created to increase the impact of training in non-clinical settings. These reusable and interactive designs can reduce the reliance on expensive and difficult-to-access cadavers and decrease supervisory stress in clinical settings.
Such practical resources provide students and instructors alike with measurable, repeatable, and effective means of preparing for professional practice.
Sawbones can deploy haptic feedback functionality across a range of medical training models. Resources can be custom-made and commercially scaled to suit any professional and educational purpose. For more information on our offerings or to talk about custom training models, contact us at 206-463-5551.

If you're seeking something you can't find on our website, our sales team is happy to help. We can either direct you to the right model or provide a free quote on the right custom project to meet your needs. Discover options with our clear bone models, laminated blocks, custom displays, or other machining projects.

Work with the industry leader in medical training products!
For four decades, Sawbones has offered the best medical training products for doctors, educators, sales specialists and more. Contact us to learn more about our high-quality models!
1 (206) 463-5551Contact Us!